The tutorial is created and made by Pink at the 14th of march 2021 with the programm Corel PaintShop Pro X7. It is also possible to make the tut with the other versions of PSP. It will be handy to have some knowledge of PSP. I can speak and write in English but it is not my native language. So if there is something you don't understand, don't hesitate to contact me. You can reach me at this mail address: pinkdesignpsp@gmail.com
----------------------------------------------------------------------------------------------------------
Materials
In the zip:
4 tubes
1 mask
1 font
Colorpalette
I tubed and made the materials myself
It is not allowed to copy the turorial and materials
----------------------------------------------------------------------------------------------------------
Plugins
Alien Skin Eye Candy 5: Impact / Brushed Metal
LOtis Filters / Mosaic Toolkit Plus --- Download this filter HERE
Nik Software / Color Effex Pro 3.0 Complete
AAA Frames / Foto Frame
----------------------------------------------------------------------------------------------------------
Preparation:
The animation will be made with animation shop
Open the materials in PSP --- Duplicate and close the originals
Color 1: #bcc95b
Color 2: #dddda9
Color 3: #ffffff
Color 4: #f9b2b2
Color 5: #f8eb94
Color 6: #f76f59
1
File / New Image --- 800 x 600 pixels transparent
Effects / Plugins / Alien Skin Eye Candy 5: Impact / Brushed Metal --- Color 1
2
Selections / Select all
Selections / Modify / Contract --- 45 pixels
Selections / Invert
Selections / Promote selection to layer
Select none
3
Put your background color at color 2 #dddda9 (The background color influences the next plugin)
Effects / Plugins/ LOtis Filters / Mosaic Toolkit Plus
4
Layers / Duplicate
Image / Resize 85%
5
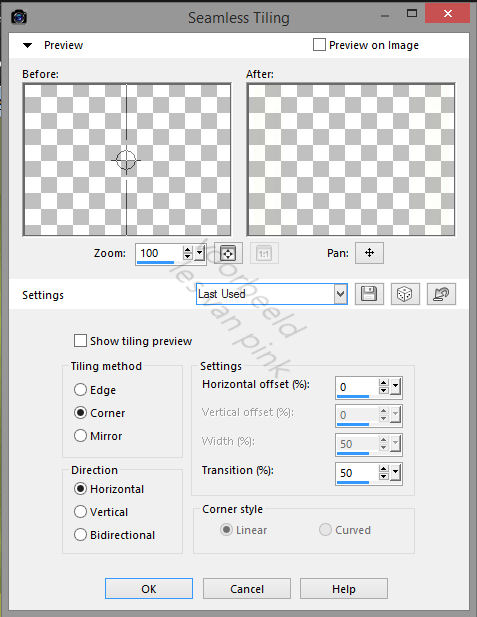
Effects / Image effects / Seamless Tiling
6
Effects / Distortion effects / Wave
7
Effects / 3D-effects / Dropshadow --- 0/0/50/35/Black
This is how the layers palette looks like:
8
Click at the middle layer of your layers palette
Effects / Edge effects / Enhance more
Edit / Repeat Enhance Edges more
Layers / Merge / Merge visible
9
Layers ./ New raster layer
Flood fill the layer with color 2 #dddda9
Layers / New mask layer / From image --- Masker les 44
10
Layers / Merge / Merge group
Create a selection with the Selection tool Rectangle (Feather at 0) as example
11
Edit / Clear
Select / None
12
Layers / Duplicate
Image / Mirror / Mirror Horizontal
Image / Mirror / Mirror Vertical
Opacity of this layer at 70%
This is how the layers palette looks like
13
Layers merge / Merge down
Effects / 3D-effects / Drop shadow, the settings are correct
14
Click at the bottom layer of your layers palette
Copy the misted tube and paste it as a new layer at your work
15
Objects / Align / Top
Blendmode at Soft light
Layers / Merge merge visible
16
Effects / Plugins / Nik Software / Color Effex Pro 3.0 Complete --- Pro Contrast
17
Selections / Select all
Image / Add borders --- 40 pixels, the color doesn't matter
Selections / Invert
18
Effects / Plugins / Alien Skin Eye Candy 5: Impact / Brushed Metal ---Color 3 #ffffff, The rest of the settings are correct
Select none
19
Effects / Plugins / AAA Frames / Foto Frame
20
Copy the tube of the dog with easter eggs and paste it as a new layer at your work
Move the tube to the bottom left side or another place you like
Effects / 3D-Effects / Drop Shadow --- The settings are correct
21
Copy the flowers tube and paste it as a new layer at your work
Move the tube to the left above, or another place you like
22
Put your background color at Black or another color you like and close the foreground color.
Write the text Happy Easter or another text you like with the text tool with these settings
23
Layers / Convert to Raster layer
Effects / 3D-effects / Drop Shadow --- 5/5/60/5/#393939
24
Copy Paasei les 44 and paste it as a new layer at your work
Pick tool (K of your keyboard)
Postition X: 523 and Position Y: 285
25
Magic wand tool with these settings
Select the bottom and above part, see exampleSelections / Modify / Expand / 1 pixel
26
Layers / New rasterlayer
Flood fill the selection with color 4 #f9b2b2
Select None
Layers / Arange / Move down
27
Click at the top layer of your layers palette
Select the following parts:
28
Selections / Modify / Expand / 1 pixel
Layers / New rasterlayer
Flood fill the selection with color 5 #f8eb94
29
Effects / Texture effects / Weave
30
Effects / Edge effects / Enhance
Select None
Layers / Arrange / Move down
31
Click at the top layer of your layers palette
Select the part outside the flowers, see example
32
Selections / Modify / Expand / 1 pixel
Layers / New rasterlayer
Effects / Plugins / Alien Skin Eye Candy 5: Impact / Brushed Metal --- The settings are correct
33
Effects / Edge effects / Enhance
Select none
Layers / Arrange / Move down
34
Click at the top layer of your layers palette
Select the flowers, see example
35
Selections / Modify / Expand / 1 pixel
Layers / New rasterlayer
Flood fill the selection with color 6 #f76f59
36
Select none
Layers / Arrange / Move down
37
Click at the top layer of your layers palette
This is how the layers palette looks like
38
4x Layers Merge / Merge down
Effects / 3D-Effects / Drop Shadow, the settings are correct
39
Add your signature
Layers / Arrange / Move down
40
Click at the top layer of your layers palette
Image / Free rotate
41
Edit / Copy special / Copy Merged
Open Animation Shop
Edit / Paste as new image
42
Go back to PSP
Click at undo
43
Edit / Copy Special / Copy Merged
Go to Animation Shop
Edit / Paste after active frame
44
Go back to PSP
Image / Free rotate
45
Edit / Copy Special / Copy Merged
Go to Animation Shop
Edit / Paste after active frame
The tutotial is finished
Save the animation in a format you want
Send your creation to: pinkdesignpsp@gmail.com
Another example with tube of Lize:


