


This tutorial is created and made at june 11th 2022 with the programm Corel PaintShop Pro 2018. It is also possible to make the tut with the other versions of PSP. It will be handy to have some knowledge of PSP. If there is something you don't understand, don't hesitate to contact me.
You can reach me at this mail address: pinkdesignpsp@gmail.com
----------------------------------------------------------------------------------------------------------


In the zip:
2 tubes
2 masks
1 decoration
1 background
1 text
1 preset
1 Selection
2 plugins
color palette
I made and tubed the materials myself
It is not allowed to copy the tutorial or materials


Mehdi / Wavy Lab en Sorting Tiles
MuRa's Meister / Perspective Tiling
Alien Skin Eye Candy5 Impact / Extrude
In Filters Unlimited 2.0:
Filter Factory Gallery B / Gradient Window
Andrew's Filters 05 / Fan

Open the materials in PSP, erase the watermark, duplicate and close the originals
Copy the selection to the folder of selections of PSP
Double click on the preset
Foreground color on color 1 and background color on color 2
Color 1: #fbfbfb
Color 2: #242424
Color 3: #76a9a9

At the end of the tutorial you will find the color palette of the other example
----------------------------------------------------------------------------------------------------------

By using other colors and tubes, don't a use a too bright foreground or background color. The other colors will be done with a filter (Andrew's filters 05). I picked color 3 after this filter was done.
1
File / New image of 800 x 600 pixels
Effects / Plugins / Mehdi / Wavy Lab --- Bow

2
Effects / Plugins / Mehdi / Sorting Tiles

3
Layers / Duplicate
Layers / Properties --- Blend mode on Multiply
(Choose another blend mode when your work is becoming too dark)
4
Layers / Merge / Merge down
Image / Mirror / Mirror Vertical
5
Layers / New raster layer --- Flood fill the layer with color 1
Layers / New mask layer / from image --- Masker 1 les 66_Pink

6
Layers / Merge / Merge Group
Layers / Properties --- Blend mode on Soft Light
Effects / 3D effects / Drop shadow --- 0/0/50/35/Black
7
Layers / New raster layer --- Flood fill the layer with color 1
Layers / New mask layer / from image --- Masker 2 les 66_Pink
8
Layers / Merge / Merge group
Effects / 3D effects / Drop shadow --- 0/0/65/15/Black
9
Effects / Plugins / <I.C.NET Software> Filters Unlimited2.0 / Filter Factory Gallery B / Gradient Window

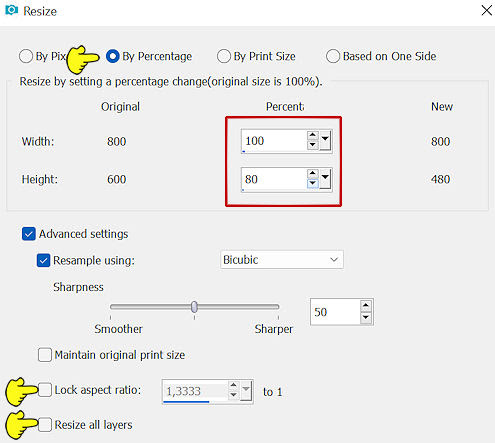
10
Image / Resize
11
Click on the bottom layer of your layer palette
Layers / Duplicate
Effects / Plugins / MuRa's Meister / Perspective Tiling

12
This is how the layers palette and tag looks like:

13
Layers / Merge / Merge visible
Layers / Duplicate
Effects / Plugins / <I.C.NET Software> Filters Unlimited2.0 / Andrew's Filters 05 / Fan

You can change the colors by hand or by clicking on Randomize untill you are satisfied.
14
Layers / Properties --- Blend mode on Soft Light
Layers / Merge / Merge visible
15
Layers / New raster layer
Selections / Load save selection / Load selection from disc --- Sel les 66_Pink

16
Flood fill the selection with color 1
Selections / Modify / Contract --- 10 pixels
Edit / Clear
17
Layers / New raster layer
Copy Deel uit bloementube or copy a rectangle selection from your (flower) tube and paste it into the selection
Selecte None
Layers / Arrange / Move down
18
Click on the top layer of your layers palette
Effects / Plugins / Alien Skin Eye Candy5 Impact / Extrude --- Preset Les 66_Pink or with these settings

19
Effects / 3D-effects / Drop shadow --- 0/0/50/35/Black
Layers / Merge / Merge down
20
Copy the text and paste it as a new layer on your work
Pick tool (K of your keyboard) Position X : 238 and Position Y: 363
Press M of your Keyboard
21
Copy the tube Tube Bloemen les 66_Pink and paste it as a new layer on your work
Image / Resize --- 40%, Lock aspect ratio checked
Adjust / Sharpness / Sharpen
22
Pick tool (K of your keyboard) Position X : 562 and Position Y: 107
Press M of your Keyboard
Effects / 3D effects / Drop shadow --- the settings are correct
23
Copy the tube Tube vrouw les 66_Pink and paste it as a new layer on your work
Image / Resize --- 70%
24
Pick tool (K of your keyboard) Position X : -62 and Position Y: 52
Press M of your Keyboard
25
Layers / Properties --- Blend mode on Luminance (Legacy)
Effects / 3D effects / Drop shadow --- the settings are correct
Layers / Merge / Merge visible
26
Put the background color on color 3
The foreground color stays on color 1
Selections / Select all
Image / Add borders --- 40 pixels, color doesn't matter
27
Selections / Invert
Effects / Plugins/ Mehdi / Wavy Lab --- Linear

28
Selections / Invert
Effects / 3D effects / Drop shadow --- the settings are correct
Selections / Modify / Select selection borders

Flood fill the selection with color 1
29
Selections / Select all
Image / Add borders --- Color 2

30
Effects / Image effects / Seamless tiling --- Side by side

31
Selections / Invert
Adjust / Blur / Gaussian Blur --- Radius on 25
32
Selections / Invert
Effects / 3D effects / Drop shadow --- the settings are correct
Select None
33
Copy Decoratie les 66_Pink and paste it as a new layer on your work
Objects / Align / Right
34
Layers / Duplicate
Image / Mirror / Mirror Horizontal
35
Image / Add borders --- 1 pixel, color 1, symmetric checked
36
Add your watermark and merge the layers
Resize your work to a size of your own wish and sharpen it when you resize it
The tutorial is finished, save your creation
I would love to see what you have made of this tutorial, it would be so nice if you share it with me.
Send your creation to: pinkdesignpsp@gmail.com
Gallery of this tutorial

Another example:
I tubed the womans tube myself
The vase is tubed by Nikita
Used colors:


