


This tutorial is created and made at march 2nd 2022 with the programm Corel PaintShop Pro X7. It is also possible to make the tut with the other versions of PSP. It will be handy to have some knowledge of PSP. If there is something you don't understand, don't hesitate to contact me.
You can reach me at this mail address: pinkdesignpsp@gmail.com
----------------------------------------------------------------------------------------------------------


In the zip:
1 tube: woman, tubed by Franie Margot
1 tube flowers
1 pattern (Patroon les 62)
1 decoration
2 texts (in Dutch and English)
4 selections
Colorpalette
Font
2 plugins
It is not allowed to copy the tutorial and materials


Simple / Top Bottom Wrap
Mock / Window
AAA Filters / AAA Multi - Filter
Graphic Plus / Cross Shadow
In Filters Unlimited 2.0:
VM Distortion / Origami Radial Folder
&<Bkg Kaleidoscope / Kaleidoscope Butterfly

Open the materials in PSP, duplicate and close the originals
Copy the selection to the folder of selections of PSP
Color 1: #272d3c
Color 2: #afb6c6

Foreground color at color 1 and background color at color 2
----------------------------------------------------------------------------------------------------------

1
Open a new image of 800 x 500 pixels
Create a radial gradient with the following settings

Flood fill the image with the gradient
2
Effects / Plugins / Simple / Top Bottom Wrap
Effects / Edge effects / Enhance
3
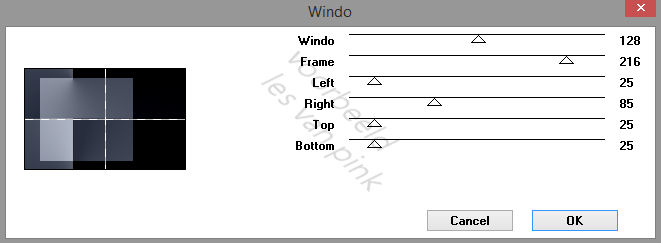
Effects / Plugins / Mock / Window
Layers / Merge / Merge all (Flatten)
4
Selections / Load/save selection / Load selection from disc --- Sel-1-Les62_Pink

5
Layers / New raster layer
Flood fill the selection with color 2
Select None
6
Activate the pattern Patroon les 62_Pink
We continue with this pattern to make a brush of it
Layers / Promote background layer
7
Selections / Select all
Selections / Modify / Contract --- 50 pixels
Edit / Clear
Select None
8
Effects / Plugins / AAA Filters / AAA Multi - Filter --- Color Edges

9
Adjust / Sharpness / Sharpen more
Layers / Duplicate
Layers / Properties / --- Blend mode at Hard light
Layers / Merge / Merge visible
10
File / Export / Custom Brush
Give it a name and save it
11
Go back to your creation
Layers / New raster layer
Paint brush with the brush you just made and the following settings

Stamp the brush with color 1 in the middle of the square, see example

If it is not at the middle you can move the brush
12
Layers / Merge / Merge down
Effects / Image effects / Seamless Tiling

Effects / 3D effects / Drop Shadow --- 0/0/50/25/Black
13
Copy the tube of Franie and paste it as a new layer on your work
Image / Resize --- 45%
Move the tube to the edge of the brush, see example

14
Adjust / Sharpness / Sharpen
Effects / 3D effects / Drop Shadow --- -10/0/50/50/Black
15
Effects / Image effects / Seamless Tiling
The settings are correct
16
Activate the bottom layer of your layers palette
Layers / Promote background layer
Effects / Plugins / <I.C.NET Software> / Filters Unlimited 2.0 / VM Distortion / Origami Radial Folder

17
Selections / Load/save selection / Load selection from disc --- Sel-2-Les62_Pink
Adjust / Blur / Gaussian blur --- Radius at 15
Select None
18
Image / Free rotate
(Pay attention that you have not forgotten to promote background layer at step 16)

Effects / 3D effects / Drop shadow --- 0/0/50/25/Black
19
Layers New raster layer
Flood fill the layer with the gradient
Layers / Arrange / Move down
20
Layers / New raster layer
Layers / Arrange / Bring to top
Selections / Load/save selection / Load selection from disc --- Sel-3-Les62_Pink
Flood fill the selection with color 2
21
Selections / Modify / Contract --- 4 pixels
Flood fill the selection with color 1
Selections / Modify / Contract --- 4 pixels
Flood fill the selections with color 2
Selections / Modify / Contract --- 4 pixels
Flood fill the selection with color 1
22
Effects / Plugins / Graphic Plus / Cross Shadow

23
Select None
Adjust / Sharpness / Sharpen
Effects / 3D effects / Drop shadow --- 0/0/80/15/Black
24
Layers / New raster layer
Selections / Load/save selection / Load selection from disc --- Sel-4-Les62_Pink
Flood fil the selection with color 2
Leave the selection active
25
Effects / Texture effects / Blinds --- Color 1

Leave the selection active
26
Effects / Edge effects / Enhance more
Effects / Plugins / <I.C.NET Software> / Filters Unlimited 2.0 / &<Bkg Kaleidoscope / Kaleidoscope Butterfly

Select None
27
Effects / Distortion effects / Twirl

28
Effects / Reflection effects / Rotating Mirror

29
Image / Mirror / Mirror Vertical
Image / Resize --- 80%
Move the decoration to the right, see example
30
Layers / Arrange / Move down
Adjust / Sharpness / Sharpen
Effects / 3D effects / Drop shadow --- The settings are correct
31
Copy the tube Tube bloemen les 62_Pink and paste it as a new layer on your work
Move the tube to a place you like
32
Copy the decoration Decoratie les 62_Pink and paste it as a new layer on your work
Move the decoration to the left above, see example
33
Copy the text and paste it as a new layer on your work
You don't have to move it
I've added the font at the materials so if you want you can make the text in your own language
34
Image / Add borders
1 pixel, Black
5 pixels, Color 2
35
Selections / Select all
Image / Add borders --- 15 pixels, Color 1
Effects / 3D effects / Drop shadow ---- 0/0/100/15/Black
When your border is very dark you can create a light shadow if you want
Select none
36
Image / Add borders --- 1 pixel, color 2
Add your signature and merge all layers (flatten)
Resize the image if you want to your own wish
The tutorial is finished, save your image.
I would love to see what you have made of this tutorial, it would be so nice if you share it with me.
Send your creation to: pinkdesignpsp@gmail.com

Another example with tube made by Liza
