


With Animation

This tutorial is created and made at january the 23th of 2022 with the programm Corel PaintShop Pro X7. It is also possible to make the tut with the other versions of PSP. It will be handy to have some knowledge of PSP. If there is something you don't understand, don't hesitate to contact me.
You can reach me at this mail address: pinkdesignpsp@gmail.com
----------------------------------------------------------------------------------------------------------
Materials

In de zip:
1 tube of Castorke (castorke_tube_div_70_062012dan)
1 tube of Syl (SvB (1124) Beauty)
1 Text of Riet (Riet Tekst Art 729 240521)
1 Text (Tekst les 59)
1 Misted tube (Misted Tube les 59_Pink)
3 selections
It is not allowed to copy the tutorial or materials

----------------------------------------------------------------------------------------------------------
Plugins
Screensworks / Block Tile
VM Toolbox / Metal Frame
Picture Man Collection: Art Gallery / Canvas
Eye Candy 4000 / Jiggle
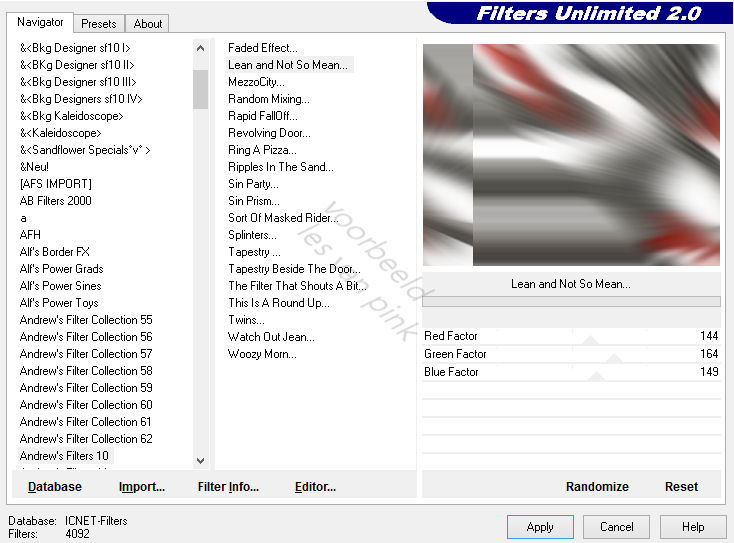
In Filters Unlimited 2.0:
Andrew’s Filters 10 / Lean and not so mean
----------------------------------------------------------------------------------------------------------
Preparation:
Open the materials in PSP, duplicate and close the originals
Copy the selections to the folder of selection of PSp
Color 1: #afa6a8
Color 2: #8e2226

----------------------------------------------------------------------------------------------------------
1
File / New image of 800 x 600 pixels
Selections / Select all
2
Activate the word art of Riet and erase the watermark
Edit / Copy
Edit / Paste into selection
Select None
3
Effects / Image effects / Seamless Tiling --- Default

4
Adjust / Blur / Radial Blur

5
Layers / Merge / Merge all (flatten)
Layers / Duplicate
Effects / Plugins / Screenworks / Block Tile
6
Layers / Load/save mask / Load mask from disc --- Msk 20-20

7
Layers / Duplicate
Edit / Repeat duplicate layer
Layers / Merge / Merge group
8
Click at the buttom layer
Layers / Duplicate
Effects / Plugins / <I.C.NET Software> Filters Unlimited 2.0 / Andrew’s Filters 10 / Lean and not so mean
9
Layers / Properties --- Blend mode at Multiply

Copy the misted tube and paste it as a new layer at your work
Layers / Arrange / Bring to top
11
Objects / Align / Left
Layers / Properties --- Blend mode at Luminance (Lagacy) and Opacity at 70

12
Layers / New raster layer
Selections / Load / save selection/ Load selection from disc --- Sel-1-les59_Pink

13
Activate the tube of Syl and erase the watermark
Copy the tube and paste it into the selection
14
Layers / New raster layer
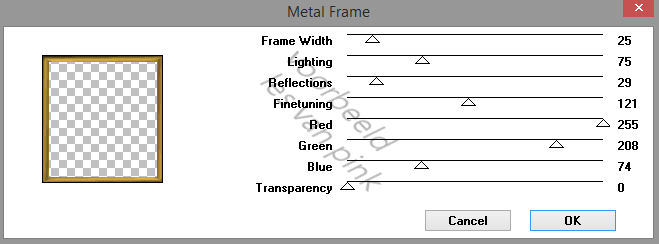
Effects / Plugins / VM Toolbox / Metal Frame --- Frame Width at 25 and Transparancy at 0
15
Select None
Effects / 3D effects / Drop shadow --- 0/0/80/25/Black
Layers / New raster layer
Selections / Load / save selection/ Load selection from disc --- Sel-2-les59_Pink
Put the opacity of the Flood fill tool at 50
Flood fill the selection with color 1
Select None
Put the opacity of the tool back at 100
17
Layers / New raster layer
Selections / Load / save selection/ Load selection from disc --- Sel-3-les59_Pink
Flood fill the selection with color 2
18
Selections / Modify / Select selection borders

Select None
19
Effects / Edge effects / Enhance
Effects / 3D effects / Drop shadow --- 1/1/100/1/Black
20
Copy the text tekst les 59 and paste it as a new layer at your work
Move the text to the left side of your work, see example
21
If you want to make the animation, skip this step and go to step 24
Activate the tube of Casorke, click at the layer of the tube
Copy the the and paste it as a new layer at your work
22
Image / Resize --- 80%
Adjust / Sharpness / Sharpen
Objects / Align / Top
Objects / Align / Right
23
Layers / Properties --- Blend mode at Luminance (Lagacy)
Effects / 3D effects / Drop shadow --- 0/0/80/25/Black
24
Copy the text Art of Riet and paste it as a new layer at your work
Move the tube to a place you like
Effects / 3D effects / Drop shadow --- 0/0/80/25/Black
25
Image / Add borders --- 8 pixels, color doesn't matter
Layers / New raster layer
Effects / Plugins / VM Toolbox / Metal Frame --- Frame Width at 8, the rest is correct
26
Effects / 3D effects / Drop shadow --- the settings are correct
Layers / Merge / Merge visible
27
Edit / Copy
Selections / Select all
Image / Add borders --- 35 pixels, color doesn't matter
28
Selections / Invert
Edit / Paste into selection
Adjust / Blur / Gaussian Blur --- Radius at 40
29
Effects / Plugins / Picture Man Collection: Art Gallery / Canvas
30
Selections / Invert
Effects / 3D effects / Drop shadow --- the settings are correct
Select None
31
Image / Add borders --- 1 pixel, Color 1
32
Add your signature and merge all layers
If you don't add the animation, the tutorial is finished, save your work
33
Now we are going to create the animation
Activate the tube of Casorke, click at the layer of the tube
Copy the the and paste it as a new layer at your work
34
Image / Resize --- 80%
Adjust / Sharpness / Sharpen
Move the tube to the right above, against the edge, see example
35
Layers / Properties --- Blend mode at Luminance (Lagacy)
36
Create a selection with the Freehand selection tool (Feather at 1 and Smoothing at 0)
Create a selection in the tube as example

37
Effects / Plugins / Eye Candy 4000 / Jiggle

38
Edit / Copy Special / Copy Merged
Open Animation Shop
Edit / Paste as new animation
39
Go back to PSP
Click twice at undo
40
Effects / Plugins / Eye Candy 4000 / Jiggle
Click at Random Seed
 Select None
41
Edit / Copy Special / Copy Merged
Go to Animation Shop
Edit / Paste after active frame
42
Go back to PSP
Click twice at undo
43
Effects / Plugins / Eye Candy 4000 / Jiggle
Click at Random Seed
Select None
44
Edit / Copy Special / Copy Merged
Go to Animation Shop
Edit / Paste after active frame
Check the animation for if you are satisfied as it is
The tutorial is finished, save your work
Share your creation: pinkdesignpsp@gmail.com
of this tutorial
With other colors and tube

With animation
I made a selection with the Selection Tool Ellipse at the bottom of the image


