This tutorial is created and made by Pink at the 8th of november 2021 with the programm Corel PaintShop Pro X7. It is also possible to make the tut with the other versions of PSP. It will be handy to have some knowledge of PSP. I can speak and write in English but it is not my native language. So if there is something you don't understand, don't hesitate to contact me.
You can reach me at this mail address: pinkdesignpsp@gmail.com
----------------------------------------------------------------------------------------------------------
Materials
In the zip:
1 mask
1 tube
2 brushes
3 selections
color palette
2 plugins
I made the materials myself
----------------------------------------------------------------------------------------------------------
Plugins
In Filters Unlimited 2.0:
Andrew's Filters 32 / Night Lines
AFH / AFH Beveler 2.0a
----------------------------------------------------------------------------------------------------------
Preparation:
Open the materials in PSP, duplicate and close the originals
Copy the selections to the folder of selections of PSP
Import the filters in Filters Unlimited if you don't have them yet
Add the brush with: File / Import / Custom Brush, give it a name and save it
Color 1: #9dc7b3
Color 2: #530b17
----------------------------------------------------------------------------------------------------------
1
Open a new image of 950 x 600 pixels
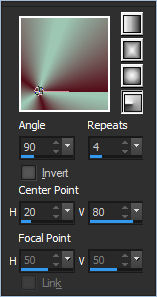
Flood fill the image with a radial gradient of the fore and background color with these settings
2
Layers / Duplicate
Image / Mirror / Mirror Horizontal
Image / Mirror / Mirror Vertical
3
Layers / Porperties --- Blendmode at Hard light
Layers / Merge / Merge visible
4
Layers / New rasterlayer
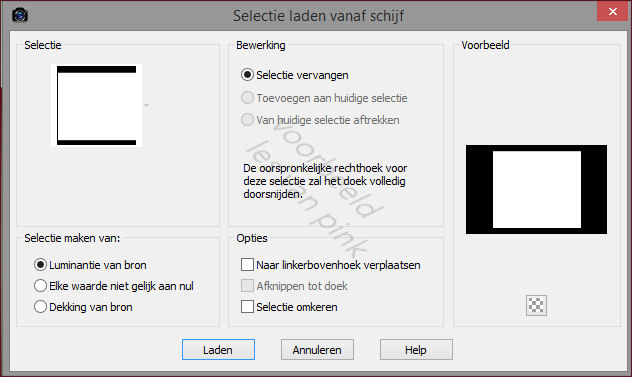
Selections / Load / save selection / Load selection from disc --- Sel-1-les56_Pink
5
Flood fill the selection with color 1
Selections / Modify / Contract --- 20 pixels
Flood fill the selection with color 2
Selections / Modify / Contract --- 3 pixels
Edit / Clear
6
Layers / New raster layer
Copy the tube and paste it into the selection of your work
7
Adjust / Blur / Radial blur
Select None
8
Layers / Duplicate
Image / Mirror / Mirror Horizontal
Image / Mirror / Mirror Vertical
11
This is how the layers palette and tag looks like:
12
Turn the visibility toggle of the bottom layer off
Layers / Merge / Merge visible
13
Turn the visibility toggle of the bottom layer back on, the upper layer stays active
Effects / Image effects / Seamless Tiling --- Side by side
14
Layers / Duplicate
Turn the visibility toggle of this layer off and click at the layer in the middle
Effects / Artistic effects / Glowing Edges
15
Layers / Porperties --- Blendmode at Soft light
16
Turn the visibility toggle of the upper layer back on and click on it to activate
Image / Resize --- 65%
17
Effects / Image effects / Seamless Tiling --- The settings are correct
Layers / Properties --- Opacity at 90
Layers / Merge / Merge visible
18
Selections / Load / save selection / Load selection from disc --- Sel-2-les56_Pink
Selections / Promote selection to layer
Effects / Plugins / <I.C.NET Software> / Filters Unlimited 2.0 / Andrew's Filters 32 / Night Lines --- Default settings
Select None
19
Layers / Properties --- Blendmode at Overlay and opacity at 65
Layers / Merge / Merge visible
20
Layers / New raster layer
Flood fill the layer with color 1
21
Layers / New mask layer / from image --- Masker les 56_Pink
Layers / Merge / Merge group
22
Effects / 3D-effects / Drop shadow --- 1/1/100/1/Black
23
Layers / New raster layer
Selections / Load / save selection / Load selection from disc --- Sel-3-les56_Pink
Flood fill the selection with color 1
24
Selections / Modify / Contract --- 15 pixels
Edit / Clear
Leave the selection active
25
Copy the tube and paste it as a new layer at your work
Layers / Arrange / Move down
Image / Resize --- 65%
Move the tube to the left and a little bit down, see example
Leave the selection active
26
Selections / Promote selection to layer
Click at the tube in your layerspalette, raster 2
Edit / Clear
Select None
27
Layers / Properties --- Opacity at 45
Click at the upper layer of your layers palette
Layers / Properties --- Blend mode at Multiply
Effects / 3D effects / Drop shadow --- The settings are correct
This is how the tag and layers palette looks like:
Layers / Merge / Merge visible
28
Effects / Plugins / <I.C.NET Software> / Filters Unlimited 2.0 / AFH / AFH Beveler 2.0a
29
Layers / New raster layer
Paint brush --- Brush tekst les 56_Pink with the following settings
30
Stamp the brush with color 1 at the top left, see example
Effects / 3D effects / Drop shadow --- The settings are correct
31
Layers / New raster layer
Paint brush --- Brush deco les 56_Pink with the following settings:
32
Stamp the brush with color 1 at the bottom right, see example
Effects / 3D effects / Drop shadow --- The settings are correct
33
Image / Add borders --- 1 pixel black
34
Add your signature and merge all the layers
Resize the image to your own wish
The tutorial is finished, save your creation
You can share your creation with me: pinkdesignpsp@gmail.com
Another example:


