This tutorial is created and made by Pink at the 16th of september 2021 with the programm Corel PaintShop Pro X7. It is also possible to make the tut with the other versions of PSP. It will be handy to have some knowledge of PSP. I can speak and write in English but it is not my native language. So if there is something you don't understand, don't hesitate to contact me.
You can reach me at this mail address: pinkdesignpsp@gmail.com
----------------------------------------------------------------------------------------------------------
Materials
In the zip:
1 person tube made by Syl
1 flowers tube
1 misted tube
2 deco's
3 selections
2 masks
1 text
Preset of Alien Skin
Colors palette
I made the rest of the materials myself
It is not allowed to copy the tutorial and the materials
----------------------------------------------------------------------------------------------------------
Plugins
Mehdi / Wavy lab
Unplugged Effects / Acid Waterfalls
It@lian Editors Effect / Effetto Tv
Alien Skin Eye Candy5 Impact / Glass
In Filters Unlimited 2.0:
VM Texture / Tiles a GoGo
Photo Aging Kit / Border Fade
Filter Factory Gallery J / Cirkle Cell
----------------------------------------------------------------------------------------------------------
Preparation:
Open the materials in PSP, duplicate and close the originals
Copy the selection to the folder of selections of PSP
Copy the mask 20-20 to the folder of masks of PSP if you don't have this one yet
Double click at the preset of Alien Skin, so it is ready for use
Fore ground color at color 1 and background color at color 2
Color1: #d89ed9
Color 2: #6c4b80
Color 3: #615975
Color 4: #868356
I picked the colors of the flowers tube I used for the background
----------------------------------------------------------------------------------------------------------
1
Open a new image of 800 x 600 pixels
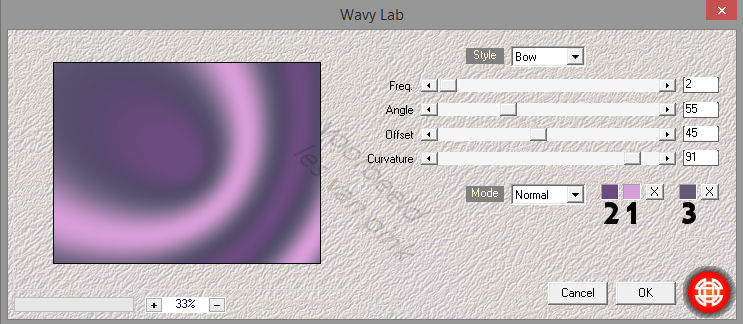
Effects / Plugins / Mehdi / Wavy Lab
Layers / New raster layer
Flood fill the layer with color 4 #868356
3
Layers / New mask layer / From Image --- Masker les 54_Pink
4
Layers / Merge / Merge group
Layers / Properties --- Blendmode at Exclusion
Layers / Merge / Merge visible
5
Layers / Duplicate
Effects / Plugins / Unplugged Effects / Acid Waterfalls
6
Layers / Properties --- Blendmode at Soft light and opacity at 50%
Layers / Merge / Merge visible
7
Effects / Plugins / <I.C.NET Software> / Filters Unlimited 2.0 / VM Texture / Tiles a GoGo
8
Layers / Duplicate
Layers / Properties --- Blendmode at Overlay
9
Selections / Select all
Layers / New raster layer
Copy Deco-1 and paste it into the selection of your work
Select None
Layers / Properties --- Opacity at 50
10
Copy tube les 54_Pink and paste it as a new layer at your work
Effects / Image effects / Seamless Tiling ---- Default
11
Adjust / Blur / Gaussian Blur --- Radius at 2
Layers / Properties --- Opacity at 73
This is how the layers palette looks like now:
Layers / Merge / Merge visible
13
Selections / Lode/save selection / Load selection from disc --- Sel-1_les54_Pink
14
Layers / New raster layer
Flood fill the selection with color 1 #d89ed9
15
16
Effects / Image effects / Seamless Tiling
17
Layers / Properties --- Blendmode at Dodge and opacity at 55
18
Objects / Align / Bottom
Layers / Merge / Merge visible
20
Effects / Plugins/ <I.C.NET Software> / Filters Unlimited 2.0 / Photo Aging Kit / Border Fade
21
Selections / Lode/save selection / Load selection from disc --- Sel-2_les54_Pink
23
Adjust / Blur /Gaussian Blur --- Radius at 20
22
Selections / Promote selection to layer
Effects / 3D-effects / Outer Bevel
Select None
Layers / Duplicate
Layers / Properties --- Blendmode at Screen
24
Layers / Merge / Merge down
Effects / 3D-effects / Drop Shadow --- 0/0/100/35/Black
25
Copy Misted tube les 54_Pink
Paste it as a new layer at your work
26
Pick tool (K of your keyboard)
Position X: 60 and Position Y: 176
Copy Deco-2 and paste it as a new layer at your work
Objects / Align / Bottom
Objects / Align / Left
28
Effects / 3D-effects / Drop shadow --- 1/0/50/0/White
Effects / Edge effects / Enhance
29
Activate the tube of Syl and erase the watermark
Copy the tube and paste it as a new layer at your work
Image / Resize / 80% , Lock aspect ratio checked
30
Layers / Load/save mask / Load mask from disc --- Msk 20-20
31
Layers / Duplicate
Layers / Merge / Merge Group
32
Copy the text and paste it as a new layer at your work
Move the text to the top left or another place of choice
34
Layers / Properties --- Blendmode at Overlay
Effects / 3D-effects / Drop shadow --- 0/0/80/35/Black
35
Image / Add Borders --- 1 pixel white
Edit / Copy
36
Selections / Select all
Image / Add borders, color doesn't matter
37
Selections / Invert
Edit / Paste into selection
38
Adjust / Blur / Radial Blur
39
Effects / Plugins / <I.C.NET Software> / Filters Unlimited 2.0 / Filter Factory Gallery J / Cirkle Cell
40
Selections / Invert
Effects / 3D-effects / Drop shadow --- 0/0/80/35/Black
Select None
41
Selections / Lode/save selection / Load selection from disc --- Sel-3_les54_Pink
Layers / New raster layer
Flood fill the selection with color 1 #d89ed9
Select None
42
Effects / Plugins / Alien Skin Eye Candy5 Impact / Glass --- Les 54_Pink
Image / Add borders / 1 pixel white, symmetric checked
44
Add your signature and merge all layers
Resize the image to a format you wish and sharpen it
The tutorial is finished, I hope you've enjoyed it
Send your creation to: pinkdesignpsp@gmail.com


