


The tutorial is created and made by Pink at the 16th of april 2021 with the programm Corel PaintShop Pro X7. It is also possible to make the tut with the other versions of PSP. It will be handy to have some knowledge of PSP. I can speak and write in English but it is not my native language. So if there is something you don't understand, don't hesitate to contact me. You can reach me at this mail address: pinkdesignpsp@gmail.com


7
Effects / Plugins / Simple / Blintz
9
Selections / Load /Save selection from disc / Load selection from disc --- Sel-1- les47_Pink

11

13
15


17

19
38


This tutorial is dedicated to Franie who translates my tutorials into French
Merci Franie pour ton excellent travail de traduction de mes tutoriels!
----------------------------------------------------------------------------------------------------------
Materials
1 Tube made by Franie
1 Mask
1 Decoration
1 Text
2 Presets
3 Selections
Color palette
I made the rest of the materials myself
It is not allowed to copy the tutorial and materials
The animation is made by Simone and it is not allowed to share it with the materials. You can download it here. Scroll down to Monday August 12 2013. You will find 3 animations in the folder, the first animation is used in this tutorial.
I changed the color of the animation in PSP and added to the creation with Animationshop.
You can skip the animation and leave it as it is, that's your choice.
If you need help with something, don't hesitate to contact me: pinkdesignpsp@gmail.com
----------------------------------------------------------------------------------------------------------
Plugins
MuRa's Meister / Copies en Perspective Tiling
Mehdi / Sorting Tiles
Simple / Blintz
Tramages / Tow The Line
Adjust / Variations
Aliën Skin Eye Candy 5: Impact / Glass en Gradient Glow
Graphic Plus / Cross Shadow
In Filters Unlimited 2.0:
&<Bkg Designer sf10 I> / Cruncher
----------------------------------------------------------------------------------------------------------
----------------------------------------------------------------------------------------------------------
Preparation:
Open the materials in PSP, duplicate them and close the originals
Doubleclick at the presets so they are ready to use
Copy the selections to the folder of selections of PSP
Color 1: #e04a31
Color 2: #ffffff
Color 3: #000000
Color 4: #b6a6a4

1
File / New Image / 850 x 600 pixels transparent
Selections / Select all
2
Go to the tube of Franie and erase the watermark
Copy the tube and paste it into the selection of your work
Select None
3
Effect / Image effects / Seamless Tiling

4
Effects / Plugins / MuRa's Meister / Copies

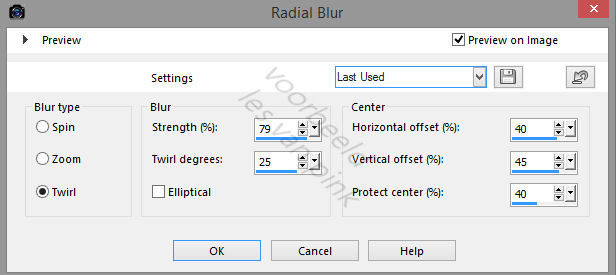
5
Adjust / Blur / Radial Blur

6
Layers / Merge / Merge all (Flatten)
Layers / Merge / Merge all (Flatten)
Effects / Plugins / Mehdi / Sorting Tiles

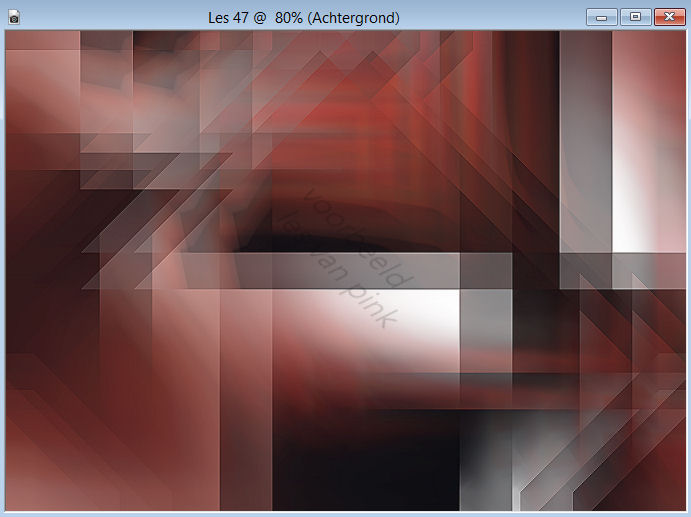
7
Effects / Plugins / Simple / Blintz
Edit / Repeat Blintz
8
Effects / Plugins / <I.C.NET Software> / Filters Unlimited 2.0 / &<Bkg Designer sf10 I> / Cruncher --- X en Y dose at 20
Effects / Edge effects / Enhance
This is how the tag looks like now (by using another tube, the tag can look different)

Selections / Load /Save selection from disc / Load selection from disc --- Sel-1- les47_Pink

Selections / Promote selection to layer
10
Effects / Plugins / Tramages / Tow The Line

Keep the selection active
Click in the layers palette at the bottom layer
Selections / Promote selection to layer
Layers / Arrange / Bring to top
12
Effects / Plugins / MuRa's Meister / Perspective Tiling

Select None
13
Layers / Merge / Merge down
Effects / 3D-effects / Drop shadow --- -10/-30/100/0/Color 1 #e04a31
Effects / 3D-effects / Drop shadow --- 0/0/80/25/Zwart
14
Layers / New raster layer
Selections / Load /Save selection from disc / Load selection from disc --- Sel-2- les47_Pink
Copy the mask (Masker les 47) and paste it into the selection of your work
Effects / Plugins/ Adjust / Variations --- Click 2x at More Red and 1x at Darker

Keep the selection active
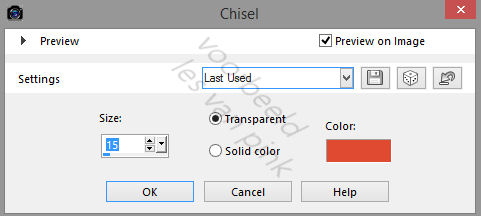
16
Effects / 3D-effects / Chisel --- Color 1 #e04a31

Select None
This is how the tag and layers palette looks like now:

Click in the layers palette at the bottom layer
Layers / New raster layer
Flood fill the layer with color 2 #ffffff
18
Layers / New mask layer / From image --- Masker les 47_Pink

Layers / Merge / Merge group
Effects / Geometric effects / Circle --- Transparent checked
Objects / Align / Left
Layers palette --- Opacity at 65%


25
Select None
27
Layers / Duplicate
28
Copy the text Franie and paste it as a new layer at your work


36
20
Copy Deco les 47 and paste it as a new layer at your work
Pick Tool (K of your keyboard) Fill in at Position X: 204 and Position Y: 128

21
Layers / New raster layer
Selections / Load /Save selection from disc / Load selection from disc --- Sel-3- les47_Pink
Flood fill the selection with color 3 #000000
Select None
Layers / Arrange / Bring to top
22
Magic wand tool with feather and tolerance at: 0
Select the triangle at the middle, see example:

Selections / Modify / Expand --- 3 pixels
23
Layers / New raster layer
Flood fill the selection with color 4 #b6a6a4
Keep the selection active
24
Effects / Plugins / Aliën Skin Eye Candy 5: Impact / Glass --- Choose at user setting: Les 47-|Glass_Pink
Effects / Plugins / Aliën Skin Eye Candy 5: Impact / Glass --- Choose at user setting: Les 47-|Glass_Pink
or use the printscreen

25
Select None
Layers / Arrange / Move down
26
In your layers palette, click at the top layer
In your layers palette, click at the top layer
Layers / Merge / Merge down
Effects / 3D-effects / Drop shadow --- 5/5/35/5/black
27
Layers / Duplicate
Image / Resize --- 55%
Image / Mirror / Mirror Horizontal (Mirror)
Move the decoration above the other decoration, see example
28
Copy the text Franie and paste it as a new layer at your work
Move the text under the decoration, see example
29
In your layers palette, click at the bottom layer
In your layers palette, click at the bottom layer
Layers / Duplicate
Blendmode at Overlay (or another blendmode you like) and the opacity at 45%
30
Go to the tube of Franie
Go to the tube of Franie
Copy the tube and paste it as a new layer at your work
Layers /Arange / Bring to top
31
Image / Resize --- 45%
Pick Tool (K of your keyboard) Fill in at Position X: 455 and Position Y: 308

32
Adjust / Sharpness / Sharpen
Adjust / Sharpness / Sharpen
Effects / 3D-effects / Drop shadow --- the settings are correct
This is how the tag and layers palette looks like now:


33
Image / Add borders --- 1 pixel color 3 black
Selections / Select all
Image / Add borders ---20 pixels color 4 #b6a6a4
34
Effects / 3D-effects / Drop shadow --- 0/0/80/20/Black
Select None
35
Selections / Select all
Image / Add borders --- 5 pixels color 1 #e04a31
Selection / Invert
Effects / Plugins / Graphic Plus / Cross Shadow --- Standard settings

Select None
Image / Add borders --- 30 pixels color 4 #b6a6a4
Effects / Plugins / Aliën Skin Eye Candy 5: Impact / Gradient Glow --- Les 47 -Gradient Glow_Pink
Or use the printscreen

37

Select with the magic wand the wide border, see example

Effects / 3D-effects / Inner Bevel

Select None
39
Copy the tube of Franie and past it as a new Layer at your work
Pick Tool (K of your keyboard) Fill in at Position X: 44 and Position Y: 54

40
Effects / 3D-effects / Drop shadow --- 0/25/50/30/Black
41
Add your signature and merge all layers
Resize the image if you want
I have resized my image to 850 pixels, I mention this because I also resize the animation.
Save your work
If you want to add the animation, continue below
----------------------------------------------------------------------------------------------------------
1
Go to the folder of animation you have downloaded
We are working with the PSP version of the animation: SimoneAni-SexyGeek-001-PSD
Open it in PSP
2
Colose the visibility of all the layers except the upper layer (15 layers are closed)
Adjust / Hue and saturation / Colorize
If you work with other colors choose other settings

3
Make the layer under the upper layer visible and active
Adjust / Hue and saturation / Colorize --- The settings are correct
4
Repeat step 3 with the rest of all the layers
5
Image / Resize / 50%, Resize all layers checked
6
File / Save as --- PSP Image
Give the animation a name and save it
7
Copy your creation
Open Animationshop and paste it as a new animation
Keep the Ctrl key down en press the letter L untill you have 16 frames

Edit / Select all
8
Open the anmition you have saved
Edit / Select all
Edit / Copy
9
Go to your creation
Edit / Paste in active frame
Add the animation to the bottom right, see example
The tutorial is finished save your animation
Send your creation to: pinkdesignpsp@gmail.com


