The tutorial is created and made by Pink at the 28th of january 2021 with the programm Corel PaintShop Pro X7. It is also possible to make the tut with the other versions of PSP. It will be handy to have some knowledge of PSP. I can speak and write in English but it is not my native language. So if there is something you don't understand, don't hesitate to contact me. You can reach me at this mail address: pinkdesignpsp@gmail.com
Materials
2 tubes, tubed by Nikita
2 texts
1 preset
Plugins
AAA Filters / AAA MultiFilter
Nik Software / Color Efex Pro 3.0 Complete
Andromeda / Perspective
AAA Frames / Foto Frame
Alien Skin Eye Candy 5 Impact / Backlight
In Filters Unlimited 2.0:
&Bkg Designer sf10 I> / 4 Way Average en Centripedal Tile
Preparing:
Open the materials, duplicate and close the originals
Double-click at the preset
File / New image / 800 x 600 pixels transparent
2
Put the background color at color 1 and the foreground color at color 2
Create a Rectangular gradient
3
Flood fill the image with the gradient
Adjust / Blut / Gaussian Blur --- Radius at 30
4
Effects / Plugins / <I.C.NET Software> Filters Unlimited 2.0 / &Bkg Designer sf10 I> / 4 Way Average
5
Effects / Plugins / <I.C.NET Software> Filters Unlimited 2.0 / &Bkg Designer sf10 I> / / Centripedal Tile --- Standaard
6
Effects / Plugins / AAA Filters / AAA MultiFilter --- Screen / Lighten
7
(How big the white border turns out with the next plugin depends how dark or light your image is. You can make your image more dark or light with the plugin of AAA Filters as before)
(How big the white border turns out with the next plugin depends how dark or light your image is. You can make your image more dark or light with the plugin of AAA Filters as before)
Effects / Plugins / Nik Software / Color Efex Pro 3.0 Complete --- Vignette
8
Selections / Select all
Selections / Modify / Contract --- 175 pixels
Selections / Promote selection to layer
Select None
9
Adjust / Blut / Gaussian Blur --- Radius at 30Effects / Image effects / Seamless Tiling
10
Layers / Duplicate
Image / Negative image
11
Effects / Plugins / Andromeda / Perspective
Click at preset first
If the plugin doesn't work in your PSP you can save the image so you can paste it at your work:
12
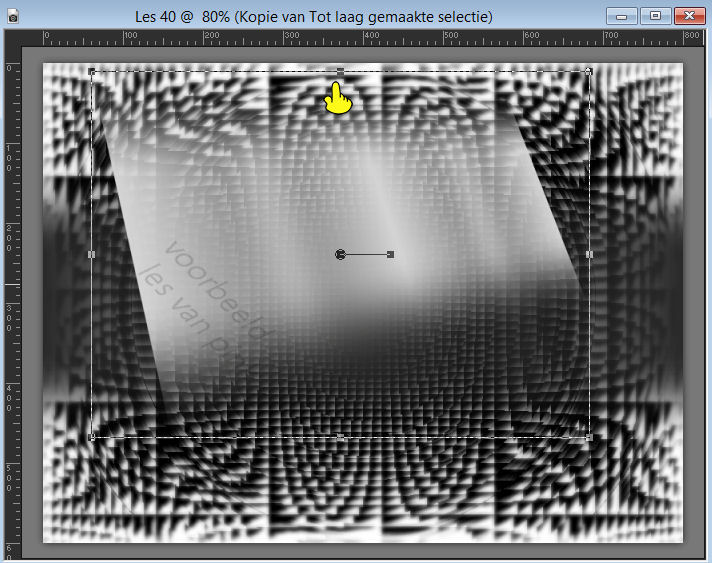
Drag the layer with the pick tool to above, see example
13
Effects / Plugins / Toadies / What are you?
Effects / Edge Effects / Enhance more
14
Click at the bottom layer of your layers palette
Layers / Duplicate
Layers / Arrange / Bring to top
Image / Negative image
15
Activate the tube 1379434306_corps_nikita and remove the signature
Copy the tube and paste it as a new layer at your work
Image / Resize --- 85%
16
Click in your layerspallete at layer Copy of Raster 117
Selections / Select all
Image / Crop to selection
Select none
18
Clik at the upper layer of your layers palette
Layers / Merge / Merge down
Effects / Plugins / AAA Frames / Foto Frame
19
Image / Resize / 40%
Adjust / Sharpness / Sharpen
20
Layers / Duplicate
Activate the layer beneath of your layers palette
21
If you don't work with the preset, put your foreground color at color 3
Effects / Plugins / Alien Skin Eye Candy 5 Impact / Backlight --- Preset Les 40_Pink
22
Effects / Distortion effects / Polar coordinates
23
Adjust / Blur / Motion blur
24
Effects / Edge effects / Enhance
25
Clik at the upper layer of your layers palette
Effects / 3D-effects / Drop shadow --- Default = 10/10/50/5/Black
26
Layers / Merge / Merge down
Pick tool: Position X:29,00 and Position Y:104,00
27
Activate the tube 13458167264_femmes_nikita and erase the signature
Activate the tube 13458167264_femmes_nikita and erase the signature
Copy the tube and paste it as a new layer at your work
Image / Mirror / Mirror horizontal
28
Layers / Arrange / Move down
Layers / Arrange / Move down
Pick tool: Position X: -148,00 and Position Y: -81,00
Blend mode at Soft Light
29
Activate the upper layer of your layers palette
Copy tekst 1 and paste it as a new layer at your work
Pick tool: Position X: 178,00 and Position Y: 145,00
30
Copy tekst 2 and paste it as a new layer at your work
Pick tool: Position X: 464,00 and Position Y: 312,00
31
Image / Add borders
1 pixel color 1
4 pixels color 3
32
Selections / Select all
Put your forgrond color at color 1 and your backround color at color 2
Image / Add borders / 30 pixels color doesn't matter
33
Selections / Invert
Flood fill the selection with the gradient
Adjust / Blur / Gaussian blur --- Radius at: 15
34
Selections / Invert
Effects / 3D-effects / Drop shadow --- 0/0/100/30/Black
Select none
35
Copy the tube 13458167264_femmes_nikita and paste it as a new layer at your work
Image / Resize --- 60%
36
Pick tool: Position X 545,00 and Position Y: 222,00
37
Adjust / Sharpness / Sharpen
Effects / 3D-effects / Drop shadow --- 7/-18/50/30/Black
38
Image / Add Borders --- 1 pixel Black
39
Add your signature and merge the layers
Resize the image if you want and sharpen it afterwards
The tutorial is ready, save your work
Send your creation to: pinkdesignpsp@gmail.com


