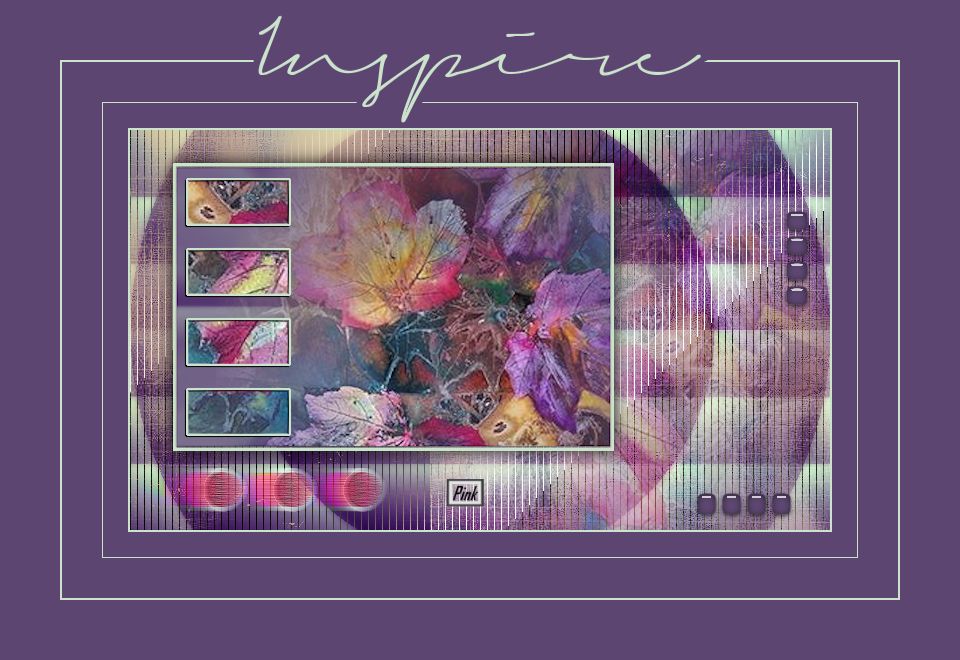
The tutorial is created and made by Pink at the first of january 2021 with the programm Corel PaintShop Pro X7. It is also possible to make the tut with the other versions of PSP. It will be handy to have some knowledge of PSP. I can speak and write in English but it is not my native language. So if there is something you don't understand, don't hesitate to contact me. You can reach me at this mail address: pinkdesignpsp@gmail.com
Materials
In the zip:
1 misted tube
1 brush
3 selections
1 font
I tubed and made the materials myself
It is not allowed to copy the tutorial and materials
Plugins
Xero / Softmood
Tramages / Tow The Line
Aliën Skin Eye Candy 5: Impact / Glass
In Filters Unlimited 2.0:
Funhouse / Radial Tile Mirror --- Download this plugin here
Preparation:
Open the materials in PSP, duplicate and close the originals
Export the brush: File / Export / Custom Brush, give the brush a name and save it
Copy the selections to the folder of selections of PSP
Foreground color at color 1 and Background color at color 2 or choose two colors of your tube
Color 1: #fffbff
Color 2: #490c2e
Color 3: #f1d647
Color 4: #946d83
1
File / New Image --- 700 x 400 pixels transparent
Create of your fore and background color a linear gradient
2
Effects / Plugins / <I.C.NET Software> / Filters Unlimited 2.0 / Funhouse / Radial Tile Mirror --- Standard settings
3
Effects / Plugins / Xero / Softmood --- Standard settings
4
Layers / New Raster Layer
Flood Fill the layer with color 1
5
Selections / Select all
Selections / Modify / Contract --- 5 pixels
Edit / Clear
Select None
6
Image / Resize
7
Select with the magic wand in the middle of the shape
Selections / Modify / Expand --- 2 pixels
Click at the bottom layer of your layers palette
Selections / Promote Selection Into Layer
8
Adjust / Blur Radial Blur
9
Copy the misted flower and paste it as a new layer in your work
Move the Flower to the right and down, see example
Selections / Invert
Edit / Clear
Select None
Layers / Duplicate
10
Turn off the visibility of the bottom layer
Layers / Merge / Merge visible
Turn the visibility of the bottom layer on again
11
Image / Resize --- 90% Lock aspect ratio checked
12
Press the letter K of your keyboard and fill in at position X: 43,00 and position Y: 33,00
Press the letter M of your keyboard
13
Effects / 3D-effects / Drop Shadow --- 0/0/100/25/Black
14
Activate the bottom layer of your layers palette
Effects / Plugins / Tramages / Tow The Line
15
Layers / New Raster Layer
Put your foreground color at color 3
Stamp the brush in the left upper corner, see example
16
Layers / Duplicate
Image / Mirror / Mirror Horizontal
Image / Mirror / Mirror Vertical
17
Blendmode at Screen and Opicity at 70%
This is how the layers palette and tag looks like
18
Activate the upper layer
Selections / Load/save selection / Load selection from disc --- Sel-les37_Pink
19
Layers / New Raster layer
Flood Fill the selection with , color 4
20
Adjust / Add/Remove noise / Add noise
21
Selections / Modify / Select selection borders -- Both sides and Anti alias checked, Border width: 2
Flood fill the selection with color 2
Select none
22
Effects / Distortion effects / Wind --- From right, wind strength: 80
Effects / Edge effects / Enhance
23
Layers / Duplicate
Objects / Align / Left
Blend mode at Screen
24
Selections / Load/save selection / Load selection from disc --- Sel-les37-2_Pink
Layers / New raster layer
Flood fill the selection with color 2
Select none
25
Effects / Plugins / Aliën Skin Eye Candy 5: Impact / Glass --- Clear
This is how the layers palette and tag looks like:
26
Selections / Load/save selection / Load selection from disc --- Sel-les37-3_Pink
Copy the misted Flower and paste it as a new layer in your work
Move the tube to above in the selection, see example
27
Selections / Promote selection to layer
Selections / Modify / Select selection borders -- Both sides and Anti alias checked, Border width: 1
28
Layers / New Raster layer
Flood fill the selection with color 1
Select none
Effects / 3D-effects / Drop Shadow --- 1/1/100/1/ Black
29
Activate Raster 5 in your layerspalette (the layer with the flower)
4x Layers / Arrange / Move Down
Blend mode: Soft Light
30
Activate the top layer in your layerspalette
Layers / Merge / merge down
Image / Mirror / Mirror Horizontal
Move the layer a bit to the left, see example
This is how the layers palette looks like:
31
Image / Add borders:
2 pixels color 1
25 pixels color 2
1 pixel color 1
40 pixels color 2
2 pixels color 1
60 pixels color 2
32
Text tool with the fot Signerica Medium and this settings
33
Put the background color at color 1 and lock the foreground color
Type at the top of the image Inspire or another text to your choice
Layers / Convert to raster layer
Objects / Align / Horizontal center
34
Freehand selection with tolerance and feather at 0
Create a selection around the text as example
(Be careful, don't select the image)
35
Layers / New raster layer
Flood fill the selection with color 2
Select none
Layers / Arrange / Move down
36
Add your signature and merge all layers
Resize your creation to your own choice
The tutorial is ready, save your work
Send your creation to: pinkdesignpsp@gmail.com
Another example


